本文可以结合博主操作视频参考安装,更便于理解。
视频地址:https://www.bilibili.com/video/BV1UtfBY5Esq/

一、PVE系统安装
1、下载PVE系统及写盘软件
PVE系统官网下载(选择种子下载更快):点此下载
PVE网盘下载:
1️⃣阿里云盘下载链接:https://www.alipan.com/s/S5L8YwXmVMS提取码: n1a5
2️⃣百度云盘下载链接:https://pan.baidu.com/s/1xy5sSc9W-PoJh6GBFgqGTg?pwd=fqkj提取码:fqkj
3️⃣夸克网盘下载链接:https://pan.quark.cn/s/8ff3ab614c5c提取码:6SvF
2、WinPE格式硬盘(按需要)
按需要,不是恢复硬盘里已有系统,硬盘数据也做好了备份,清除一下硬盘可以避免一些未知问题。
1️⃣FirPE下载:官网下载
2️⃣微PE下载:官网下载
3️⃣直接食用WinPE ios文件:
阿里云盘链接:https://www.alipan.com/s/uJoPbPjr5AS提取码: d4g8
夸克网盘链接:https://pan.quark.cn/s/6d04d041553a提取码:5AUV
百度网盘链接:https://pan.baidu.com/s/1-0UhyHy5xr8WfVGz1FQa-A?pwd=fqkj,提取码:fqkj
3、PVE系统写盘
推荐Ventoy:点此下载
Ventoy在折腾各种系统时无需反复地格式化U盘,你只需要把 ISO/WIM/IMG/VHD(x)/EFI 等类型的文件直接拷贝到U盘里面就可以启动了。
建议找一个16G以上的U盘,按照Ventoy官方文档写盘,写盘结束后将下载的PVE系统拷贝进U盘。
其他工具rufus、balenaEtcher类似。
4、BIOS设置
开机按快捷键进入BIOS
- intel主板开启VT,VT-D,来电自启动和选择U盘启动
- AMD主板开启IOMMU,SVM,来电自启动和选择U盘启动
- 开启硬盘热拔插
- 开启Above4G,SR-IOV(若有)
- 开启网络唤醒(若需要)
- 打开UEFI引导,关闭CSM兼容模式(DG1等纯UEFI类的显卡需要)
5、安装PVE系统
详细安装教程见视频。
- PVE IP:
10.0.0.254/24(网段和IP按照自己的喜好设置即可) - 子网掩码:
255.255.255.0 - 网关:
10.0.0.1 - DNS:
10.0.0.1
安装后登陆地址(登录电脑需要在同网段):https://10.0.0.254:8006
用户名:root
密码:你设置的
6、给PVE的扩容(可选项)
移除local-lvm可能会影响PVE的部分快照功能。
在shell里边输入:
lvremove pve/data
点击y后,再输入:
lvextend -l +100%FREE -r pve/root
再点击数据中心 – 存储 – local-lvm – 移除,再双击local,把内容里的所有选项都选中。
7、去除PVE无有效订阅提示(可选项)
pve6.3版本到pve7版本可以执行:
sed -Ezi.bak "s/(Ext.Msg.show\(\{\s+title: gettext\('No valid sub)/void\(\{ \/\/\1/g" /usr/share/javascript/proxmox-widget-toolkit/proxmoxlib.js && systemctl restart pveproxy.service
pve8版本可以执行:
sed -i.backup -z "s/res === null || res === undefined || \!res || res\n\t\t\t.data.status.toLowerCase() \!== 'active'/false/g" /usr/share/javascript/proxmox-widget-toolkit/proxmoxlib.js && systemctl restart pveproxy.service
8、开启PVE直通功能
shell里输入如下命令:
#若你的CPU为Intel:
sed -i '/^GRUB_CMDLINE_LINUX_DEFAULT/c\GRUB_CMDLINE_LINUX_DEFAULT="quiet intel_iommu=on iommu=pt pcie_acs_override=downstream"' /etc/default/grub

#若你的CPU为AMD修改为
sed -i '/^GRUB_CMDLINE_LINUX_DEFAULT/c\GRUB_CMDLINE_LINUX_DEFAULT="quiet amd_iommu=on iommu=pt pcie_acs_override=downstream"' /etc/default/grub
增加所需模块,修改文件/etc/modules,输入如下命令:
echo -e "vfio\nvfio_iommu_type1\nvfio_pci\nvfio_virqfd" | tee -a /etc/modules
更新上述配置信息并重启PVE:
update-grub
update-initramfs -u -k all
reboot
验证是否已开启iommu:
dmesg | grep iommu
看看可直通设备列表:
lspci
二、虚拟路由安装(通网)
1、安装iKuai (主路由,若需要)
下载iKuai官方镜像:点此下载
添加要直通的网卡,对应好网口,设置wan、lan
网关设为10.0.0.1(主路由IP)
DNS可用阿里223.5.5.5和腾讯119.29.29.29
默认用户名:admin,默认密码:admin
进入Shell ping下试试网络是否正常
ping baidu.com
2、安装iStoreOS或OpenWrt(旁路由)
iStoreOS是基于OpenWrt开发的,大家看个人喜好,我这里以iStoreOS为例。
下载iStoreOS镜像:点此下载
img文件挂载(如果你没有扩容的话,你可能需要在下面命令的后边加上-lvm,如:qm importdisk pve虚拟机id img文件路径 local-lvm):
#pve虚拟机id和img文件路径替换为自己的
qm importdisk pve虚拟机id img文件路径 local

#如:
qm importdisk 101 /var/lib/vz/template/iso/istoreos.img local
修改IP,输入以下命令快速设置:
quickstart
旁路有网关设为10.0.0.1(旁路由IP)
默认用户名:root,默认密码:password
iStoreOS插件下载:
https://github.com/AUK9527/Are-u-ok/tree/main/x86
网盘下载:
1️⃣夸克网盘链接:https://pan.quark.cn/s/172d3ddb84fe提取码:U2AR
2️⃣百度网盘链接:https://pan.baidu.com/s/1wBrhmexOePOdRrb2BG06xA?pwd=fqkj提取码:fqkj
三、给PVE换源(建议)
目前使用DG1直通硬解的目前不要进行换源,更新PVE配置后DG1直通后无法驱动!!
注意:这里需要PVE联网正常才可以操作:
可以ping一下网络,ping baidu.com ,如果ping不通,则要检查网关和DNS
PVE优化、美化(可选项)
显示cpu、nvme、主板温度,来自恩山大佬点击查阅:
(curl -Lf -o /tmp/temp.sh https://raw.githubusercontent.com/a904055262/PVE-manager-status/main/showtempcpufreq.sh || curl -Lf -o /tmp/temp.sh https://mirror.ghproxy.com/https://raw.githubusercontent.com/a904055262/PVE-manager-status/main/showtempcpufreq.sh) && chmod +x /tmp/temp.sh && /tmp/temp.sh remod
国内清华源和中科大较快,可根据地理位置就近选一个即可
- 清华源:https://mirrors.tuna.tsinghua.edu.cn/help/debian/
- 中科大源:https://mirrors.ustc.edu.cn/help/debian.html
将自带的源文件sources.list备份
cp /etc/apt/sources.list /etc/apt/sources.list_bak
编辑sources.list文件,注释掉自带的源,添加国内源:
nano /etc/apt/sources.list
6.x清华源:
deb https://mirrors.tuna.tsinghua.edu.cn/debian/ buster main contrib non-free
deb https://mirrors.tuna.tsinghua.edu.cn/debian/ buster-updates main contrib non-free
deb https://mirrors.tuna.tsinghua.edu.cn/debian/ buster-backports main contrib non-free
deb https://mirrors.tuna.tsinghua.edu.cn/debian-security buster/updates main contrib non-free
deb https://mirrors.tuna.tsinghua.edu.cn/proxmox/debian buster pve-no-subscription
7.x国内源:
#清华源:
deb https://mirrors.tuna.tsinghua.edu.cn/debian/ bullseye main contrib non-free
deb https://mirrors.tuna.tsinghua.edu.cn/debian/ bullseye-updates main contrib non-free
deb https://mirrors.tuna.tsinghua.edu.cn/debian/ bullseye-backports main contrib non-free
deb https://mirrors.tuna.tsinghua.edu.cn/debian-security bullseye-security main contrib non-free
deb https://mirrors.tuna.tsinghua.edu.cn/proxmox/debian bullseye pve-no-subscription

#中科大源:
deb https://mirrors.ustc.edu.cn/debian/ bullseye main contrib non-free
deb https://mirrors.ustc.edu.cn/debian/ bullseye-updates main contrib non-free
deb https://mirrors.ustc.edu.cn/debian/ bullseye-backports main contrib non-free
deb https://mirrors.ustc.edu.cn/debian-security bullseye-security main contrib
deb https://mirrors.ustc.edu.cn/proxmox/debian bullseye pve-no-subscription
8.x国内源:
#清华源:
deb https://mirrors.tuna.tsinghua.edu.cn/debian/ bookworm main contrib non-free non-free-firmware
deb https://mirrors.tuna.tsinghua.edu.cn/debian/ bookworm-updates main contrib non-free non-free-firmware
deb https://mirrors.tuna.tsinghua.edu.cn/debian/ bookworm-backports main contrib non-free non-free-firmware
deb https://mirrors.tuna.tsinghua.edu.cn/debian-security bookworm-security main contrib non-free non-free-firmware

#中科大源:
deb https://mirrors.ustc.edu.cn/debian/ bookworm main contrib non-free non-free-firmware
deb https://mirrors.ustc.edu.cn/debian/ bookworm-updates main contrib non-free non-free-firmware
deb https://mirrors.ustc.edu.cn/debian/ bookworm-backports main contrib non-free non-free-firmware
deb https://mirrors.ustc.edu.cn/debian-security bookworm-security main contrib non-free non-free-firmware
编辑PVE企业源,原句前加#注释掉自带源:
nano /etc/apt/sources.list.d/pve-enterprise.list
添加清华源或中科大源,二选一:
#清华源
deb https://mirrors.tuna.tsinghua.edu.cn/proxmox/debian bookworm pve-no-subscription

#中科大源
deb https://mirrors.ustc.edu.cn/proxmox/debian bookworm pve-no-subscription
按Ctrl+X -> Y – >回车退出。
修复源401错误,原句前加#注释掉(若无401错误可忽略):
nano /etc/apt/sources.list.d/ceph.list
添加中科大ceph源:
deb https://mirrors.ustc.edu.cn/proxmox/debian/ceph-quincy bookworm no-subscription
按Ctrl+X -> Y – >回车退出。
更新生效:
apt update && apt dist-upgrade -y
更新LXC源(若不需要可跳过)
备份APLInfo.pm
cp /usr/share/perl5/PVE/APLInfo.pm /usr/share/perl5/PVE/APLInfo.pm_back换源清华源与中科大源二选一:
#清华源
sed -i 's|http://download.proxmox.com|https://mirrors.tuna.tsinghua.edu.cn/proxmox|g' /usr/share/perl5/PVE/APLInfo.pm
#中科大源
sed -i 's|http://download.proxmox.com|https://mirrors.ustc.edu.cn/proxmox|g' /usr/share/perl5/PVE/APLInfo.pm
重启服务:
systemctl restart pvedaemon.service
重启PVE
reboot
四、开启核显SR-IOV(若需要)
开启SR-IOV项目地址:https://github.com/strongtz/i915-sriov-dkms
请逐条运行:
apt install build-* dkms git sysfsutils -y
apt install proxmox-headers-$(uname -r) proxmox-kernel-$(uname -r)
cd ~
clone代码库(此处需要pve连接github,可试试修改DNS,比如8.8.8.8,8.8.4.4等)
git clone https://github.com/strongtz/i915-sriov-dkms.git
也可以使用国内镜像代码库,但在使用前查看代码是否最新或可用。
git clone https://gitee.com/ifwwww/i915-sriov-dkms
安装sriov模块,请逐条运行:
cd ~/i915-sriov-dkms
dkms add .
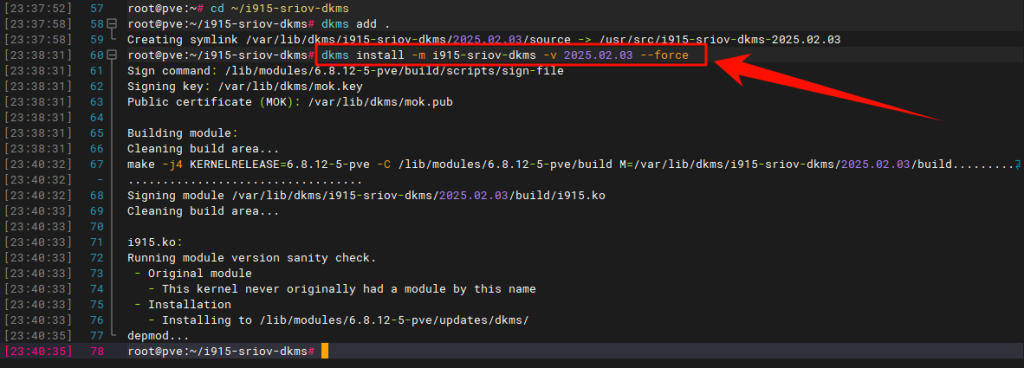
这里因大佬版本变化,与视频不一样,特更新文字版教程如下:
这里记录出现的i915-sriov-dkms版本号,比如此时示范时如上图所示版本号为“2025.02.03”(该版本号会变,请以你的实际版本为准),将下面这行代码中的汉字替换为你的版本号再运行代码:
dkms install -m i915-sriov-dkms -v 把这里换成版本号 --force
这个运行需要一点时间,请耐心等待,如下图所示:
编辑 grub 配置文件
nano /etc/default/grub
在 quiet 后添加i915.enable_guc=3 i915.max_vfs=7的“7”表示可以添加7个虚拟核显(最多7个),添加数量越多核显性能越弱,大家按需选择,我这里设置为3
i915.enable_guc=3 i915.max_vfs=3
键盘组合键ctrl+x再输入y 回车保存退出
更新grub和initramfs
update-grub
update-initramfs -u
查看当前核显ID,并记录:
lspci | grep VGA
将上面记录的核显ID替换下面代码中的0000:00:02.0(有可能没有显示0000:,下面的代码中补全即可),sriov_numvfs = 3 中的 3 是需要虚拟的核显数量,需要和上面的设置的数量相同
echo "devices/pci0000:00/0000:00:02.0/sriov_numvfs = 3" > /etc/sysfs.conf
reboot
重启在PVE的Shell中输入以下命令查看SR-IOV核显直通是否成功:
lspci | grep VGA
输出以下数据,表示成功
0000:00:02.0 VGA compatible controller: Intel Corporation AlderLake-S GT1 (rev 0c)
0000:00:02.1 VGA compatible controller: Intel Corporation AlderLake-S GT1 (rev 0c)
0000:00:02.2 VGA compatible controller: Intel Corporation AlderLake-S GT1 (rev 0c)
0000:00:02.3 VGA compatible controller: Intel Corporation AlderLake-S GT1 (rev 0c)
若想卸载i915-sriov-dkms,操作如下:
使用dpkg卸载package
dpkg -P i915-sriov-dkms
使用pacman卸载package
pacman -R i915-sriov-dkms
使用manual卸载 dkms 模块(下面代码改为自己的版本号,这里以2025.02.03为例)
dkms remove i915-sriov-dkms/2025.02.03
重启PVE
reboot
五、虚拟机安装(按需选择)
前3个NAS或者其他NAS大家按需选择安装即可。
1、安装fnOS
飞牛NAS官网:飞牛私有云 fnOS (fnnas.com)
本教程来自皮蛋熊大佬分享的驱动,感谢大佬的辛苦付出:飞牛NAS使用DG1教程
查询直通设备ID:
lspci
若为SR-IOV核显直通则需要借用DG1的驱动,先不带核显安装好fnOS,再手动安装驱动:
sudo -i # 切换root权限
wget https://blog.kkk.rs/upload/intel-i915.deb # 下载驱动
dpkg -i intel-i915.deb # 安装驱动
驱动安装完成后关机,添加SR-IOV虚拟的核显(切记不可直通主显卡,否则所有虚拟核显消失),再开机测试硬解情况。
降低视频分辨率检验硬解效果,可以看看飞牛CPU占用情况,不异常高就表示成功了。
播放测试也可以安装工具查看查看核显调用情况:
apt install intel-gpu-tools -y
intel_gpu_top
ssh登陆抓取如下信息:
sudo -i # 输入密码切换到root账户
dmesg | grep i915 # 看看是否有报错等输出
ls /dev/dri # 看看是否有 card0 renderD128 这种节点
lspci -vd 8086:4908 # 看看是否所有的BAR都分配了地址,如果有BAR没有分配到地址,请回bios中开启Above4G选项。
由于飞牛系统还处于公测阶段,每一次更新系统都需要检查驱动是否失效,若失效可按照上述步骤重新安装一次驱动。
2、安装黑群晖
使用RR引导安装:RR官网下载
国内网盘下载:
1️⃣夸克网盘下载链接:https://pan.quark.cn/s/972adf793a89提取码:t9F5
2️⃣百度网盘链接:https://pan.baidu.com/s/12rgUEXVAUZUOsI2wKXTzrA?pwd=fqkj提取码:fqkj
核显驱动查验:
sudo -i
ls -la /dev/dri
#或
ls /dev/dri

#检查lsmod i915模块
lsmod | grep i915

#检查dmesg i5固件
dmesg | grep i915
N大Jellyfin Docker版镜像(需解决联网问题):
docker pull nyanmisaka/jellyfin:latest
3、安装TrueNAS
下载TrueNAS官方OS系统:https://www.truenas.com/
TrueNAS云盘下载:
1️⃣123云盘下载:https://www.123pan.com/s/pB6uVv-L66YA?提取码:fqkj
2️⃣夸克网盘下载:https://pan.quark.cn/s/df76eaa0a9e7提取码:CWhL
3️⃣百度云盘下载:https://pan.baidu.com/s/1ag0RfeE9W75ZKnSmN1HMMg?pwd=fqkj提取码:fqkj
4、安装Windows
我这里使用的不忘初心win10 LTSC的镜像。
云盘下载:
1️⃣夸克网盘下载:https://pan.quark.cn/s/2af51ea81711提取码:tsBZ
2️⃣百度云盘下载:https://pan.baidu.com/s/1ZiHWZti-VOWtan3dhGpOew?pwd=fqkj提取码:fqkj
virtIO驱动ISO:点此下载
系统安装时先不要添加虚拟核显,也不要勾选主GPU,在系统安装完后再添加。
英特尔® Arc™ 和锐炬® Xe 显卡 (intel.cn)
https://www.intel.cn/content/www/cn/zh/download/785597/intel-arc-iris-xe-graphics-windows.html
5、安装LXP容器
看大家需要和习惯安装。
六、尾巴
设置开机启动顺序、IP标记之类…

 番茄科技-电脑,手机,网络知识,应用分享
